Setup & Settings Reference
Full reference for all iReporter settings
- General Settings
- Voice Options
- iRacing Options
- Webhook Options
- ElevenLabs Configuration
- Push to Talk Setup
General Settings
Input Mode
The Input Mode dropdown at the top left of the General Settings panel controls which physical input device iReporter listens to for button presses.
Three options are available:
When Stream Deck or iReporter Button Box & Stream Deck is selected, an Install Stream Deck Plugin button appears below the dropdown. Clicking it downloads and installs the Stream Deck plugin automatically into the correct plugins folder. If Stream Deck is already running, iReporter will ask whether to restart it now - the plugin files are copied without deleting the existing plugin folder, so Stream Deck does not lose its registration.
Version / Build Number

The current version of iReporter is displayed in small grey text next to the iReporter title at the very top of the settings panel (for example, v0.91). This is useful when reporting a problem or checking whether you have the latest release.
If a newer version is available, a highlighted banner will appear below the title bar notifying you of the update and showing both your current version and the version available. You can also check for updates at any time using the Check for Update button in the top row of the settings panel - this will immediately query the update server and prompt you to download and install if a newer version exists.
Connection Status

Directly below the title, iReporter displays a live status bar that shows whether your iReporter Button Box is connected and recognised. The status updates automatically every 2 seconds and uses colour coding to make the state immediately obvious at a glance.
| Colour | Status | What it means |
|---|---|---|
| Green | Verified and Connected | The iReporter Button Box has been found and confirmed as an iReporter device. Everything is working correctly. |
| Amber | Connected - Not Confirmed | A serial device has been detected but has not yet responded as an iReporter Button Box. This can appear briefly during startup while the device is initialising. |
| Red | Not Connected | No iReporter device was found. Check that the Button Box is plugged in via USB, then click Auto Detect to scan all available ports. |
COM Port - Auto Detect
iReporter automatically scans all available COM ports on startup to find your Button Box. It sends a PING command to each port and connects to whichever responds with IREPORTER_READY. The detected port is shown in green in the settings panel and saved for future sessions - the last known port is always tried first for faster reconnection.
If the device is not found automatically (e.g. after changing USB ports), click Auto Detect to trigger a fresh scan at any time.
If you need to connect to a specific COM port manually - for example when using an Arduino-based button box on a known port - type the port number (e.g. 7 or COM7) in the manual field and click Connect.
Number of Buttons
Message Prepend
An optional prefix added to the start of every message before it is sent. This is particularly useful to bring up the text chat box within iRacing. By default "t" is assigned to activating the text chat box and allowing for text entry. It also can be used for tagging messages with a race series name or session identifier, for example: /rc or [SpeedTech Racing]
Enable Logging
When enabled, every button press and the resulting message are written to a dated log file in Documents\iReporter\logs\. One file is created per day, named iReporter_YYYY-MM-DD.txt. Button press events are labelled [Button Press Event] in the log to distinguish them from detection events.
Logging Settings
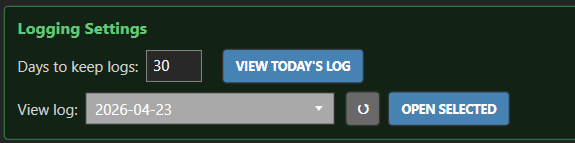
Visible only when Enable Logging is turned on.
- Days to keep logs - iReporter automatically deletes log files older than this many days on startup. Default is 30 days. Valid range is 1-365.
- View Today's Log - opens the current day's log file in Notepad.
- View log - select any past log date from the dropdown and click Open Selected to review it. Use the ? button to refresh the list if new files have appeared.
Voice Options
Overview
iReporter can speak a message aloud when a button is pressed. Voice is configured globally in the Voice Options section and then controlled per-button using a Speak Text field on each button.
Enable Voice
Tick Enable Voice in the top bar to activate voice output. When enabled, the Voice Options and Push to Talk panels expand, and a Speak Text field appears on every button.
Voice Engine
Use the Voice Engine dropdown at the top of the Voice Options panel to choose between two speech engines:
| Engine | Description |
|---|---|
| Microsoft Voice | Uses the built-in Windows Text-to-Speech engine (SAPI). No internet connection required. Voice quality depends on your installed Windows voices - additional voices can be installed via Windows Settings > Time & Language > Speech. |
| Eleven Labs | High-quality cloud voice synthesis from ElevenLabs. Requires an API key and an internet connection. Produces significantly more natural-sounding speech than Windows TTS. See ElevenLabs Configuration for setup instructions. |
Selecting an engine shows only the configuration relevant to that engine.
Microsoft Voice Configuration
When Microsoft Voice is selected, a Windows Voice dropdown appears. Select any installed Windows SAPI voice. The default option uses whichever voice Windows has set as the system default.
ElevenLabs Configuration
When Eleven Labs is selected, the ElevenLabs configuration panel appears. See the ElevenLabs Configuration page for full setup instructions including how to obtain an API key.
Key fields:
- API Key - your ElevenLabs account API key
- Voice - click Load Voices to fetch available voices from your account, then select one
- Voice Output Device - the audio device used for speech output. Set to VB-Audio CABLE Input if you want voice routed through a virtual microphone into iRacing
- Switch to Microsoft Voice - clears ElevenLabs settings and switches back to Microsoft Voice
No Car Detected
The No Car Detected text box in the Voice Options panel sets the phrase spoken when a button that uses crash or incident variables is pressed but no car has been captured yet.
Normally, if a crash or incident button is pressed before any car data has been detected, the voice message would be spoken with blank or placeholder values for variables like {CRASHCAR} or {INCIDENTDRIVER}. With the No Car Detected text set, iReporter speaks this phrase instead of the N/A-filled message, making the output much cleaner and more informative.
This text also serves as the global fallback value for all variable substitutions - both in text messages and in voice output. Whenever a message variable has no current value (for example, {CRASHCAR} when no crash has been detected), the No Car Detected text is substituted in place of the default N/A. This applies to all button types and all variable fields across the entire plugin.
Output Volume
The Output Volume dropdown controls the playback volume of speech output. This applies to both Microsoft Voice and ElevenLabs. Available settings are 50%, 75%, 100%, 125%, 150%, 175%, and 200%.
100% is the default (no amplification). If competitors report that your radio voice is too quiet, increase this to 150% or 175%. Values above 100% digitally amplify the audio samples - very loud settings may introduce clipping on some voice clips.
Push to Talk
The Push to Talk box (inside the Voice Options panel) lets you configure a key that iReporter holds down for the full duration of each spoken message. This activates your in-sim radio PTT so the voice is transmitted to other drivers.
Use the PTT Key dropdown to select from:
- F1 - F12 - a plain function key
- Ctrl+F1 - Ctrl+F12 - Control + function key combination
- Shift+F1 - Shift+F12 - Shift + function key combination
- (None) - no PTT key (voice plays without pressing any key)
Set the same key as your iRacing radio PTT binding. iReporter injects the keypress at the hardware scan-code level, which behaves identically to a physical key press and is reliably detected by iRacing.
See Push to Talk Setup for full configuration instructions.
Pauses in Spoken Text
You can insert pauses into any Speak Text field using the {PAUSE} or {PAUSE:N} variable, where N is the pause duration in milliseconds.
{PAUSE}- inserts a 500 ms pause{PAUSE:1000}- inserts a 1000 ms (1 second) pause
Example: Crash detected. {PAUSE:500} Car {CRASHCAR} at turn three.
During a pause, iReporter transmits silence PCM audio to keep the radio channel open. This prevents iRacing from dropping the PTT transmission mid-message.
Per-Button Voice Control
When voice is globally enabled, a Speak Text box appears on each button. Enter the text to be spoken when that button is pressed. Message variables such as {DRIVER} and {CAR#} are supported and substituted with live data at press time.
The Disable Voice for this button checkbox (shown in the options row below the Button Mode dropdown) suppresses voice output for that specific button while keeping the speak text saved for future use.
Voice is always spoken before the text messages are sent to the iRacing chat box. This ensures PTT is fully released before the chat key (T) is pressed, which would otherwise interrupt the radio transmission.
iRacing Options
Overview
The iRacing Options section enables features that read live data directly from iRacing. Enable the iRacing Options checkbox to expand the section.
Message Text Limits
When enabled, message text boxes are limited to the iRacing in-game chat character limit (approximately 60 characters). A character counter is shown beside each message field. This prevents messages from being truncated when typed into the iRacing chat box.
Crash Capture
Monitors all cars on track for sudden increases in incident points. When a car receives incident points at or above the Crash Detection Incident Points threshold, iReporter captures that car's details and makes them available as message variables.
- Crash Detection Incident Points - the minimum incident point delta in a single update that counts as a crash. Default is 4. Lower values will trigger more frequently.
- Crash Timeout - how long the captured crash data remains active, controlled by a slider (0-60 seconds).
- No Timeout (0) - crash data persists indefinitely until the next crash is detected and overwrites it. The LED will flash briefly (600ms) on capture to confirm detection, then turn off.
- Timed (1-60s) - crash data is cleared after the specified number of seconds. The LED stays on for the full duration and turns off when the timeout expires.
- Timeout LED - select a LED colour (None / RED / BLUE / GREEN / AMBER) to illuminate on your button box when a crash is active.
- Crash Capture Detection Logging - when ticked, every crash detection event is written to the log file as a
[Crash Capture Detection Event]entry, recording the car number, driver name, direction, and lap. This is separate from button press logging and lets you review every detection regardless of whether a button was pressed.
When a crash is active, buttons that have a Crash Fallback message configured will send that fallback message if the button is pressed and no crash is currently detected.
Incident Capture
Works identically to Crash Capture but for lower-severity incidents. An event is captured as an incident only when the incident point delta meets or exceeds the Incident Detection Points threshold and is strictly below the Crash Detection Incident Points threshold. This ensures that crash-level events are never captured as incidents, and the two detections are always mutually exclusive.
- Incident Detection Points - minimum incident delta to trigger incident capture. Should be set lower than the Crash Detection threshold.
- Incident Timeout - controls how long incident data remains active (0-60 seconds).
- No Timeout (0) - incident data persists until the next incident overwrites it. LED flashes briefly (600ms) on capture to confirm, then turns off.
- Timed (1-60s) - incident data cleared after the specified seconds. LED stays on for the full duration.
- Timeout LED - LED colour while an incident is active.
- Incident Capture Logging - when ticked, every incident detection event is written to the log file as an
[Incident Capture Detection Event]entry. Crash-level events will never appear here.
Solo Incident Filter
iReporter automatically ignores crash and incident events when no competitor car is within 0.5 seconds gap ahead or behind at the moment of detection. This prevents false captures caused by solo incidents - for example, running wide on a kerb or spinning without contact - where the incident points are clearly self-inflicted and do not involve another competitor.
If both the gap ahead and gap behind are greater than 0.5 seconds (or no cars are tracked nearby), the detection event is silently discarded and no crash or incident state is set. Pitted cars are excluded from the gap calculation and will not satisfy the proximity check.
Blue Flag Helper
Tracks the top X cars by race position and alerts you when one of them is approaching from behind and is more than one full lap ahead of your position. This helps you anticipate and respond to blue flag situations before they become an issue.
- Top [ ] Cars Approaching Within [ ] seconds behind - configure how many leading cars to monitor and how close they need to be to trigger the alert. The approach seconds field accepts decimal values (e.g.
0.5,1.5,2.5) with no enforced minimum. For example, setting Top 10 and 30 seconds will activate the LED when any of the top 10 cars are within 30 seconds behind you and at least one full lap ahead. - Approach LED - LED colour to illuminate on your button box when a qualifying leader is approaching.
Note: The LED will ONLY activate when the approaching car is more than 1 full lap ahead. Cars on the same lap as you will never trigger the alert.
Webhook Options
Overview
iReporter can post messages to Discord (or any webhook-compatible service) automatically when a button is pressed. Up to three webhooks can be configured.
Enable Discord Reporting
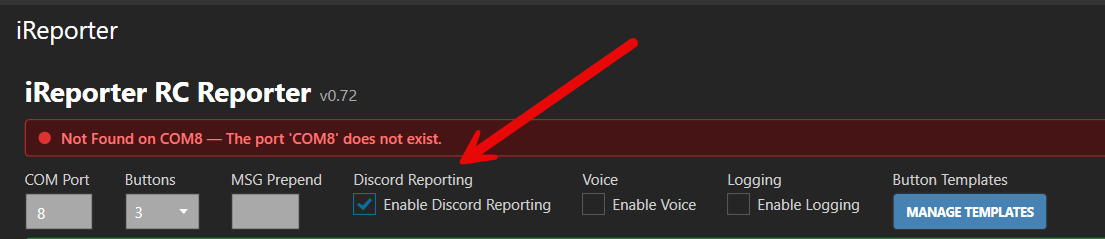
Master switch for webhook posting. When unchecked, no messages are sent to any webhook.
Getting a Discord Webhook URL
Before you can configure a webhook in iReporter, you need to create one in Discord. You need to have Manage Webhooks permission in the Discord server to do this.
Paste the copied URL into one of iReporter's Webhook URL fields as described below.
Configuring Webhooks
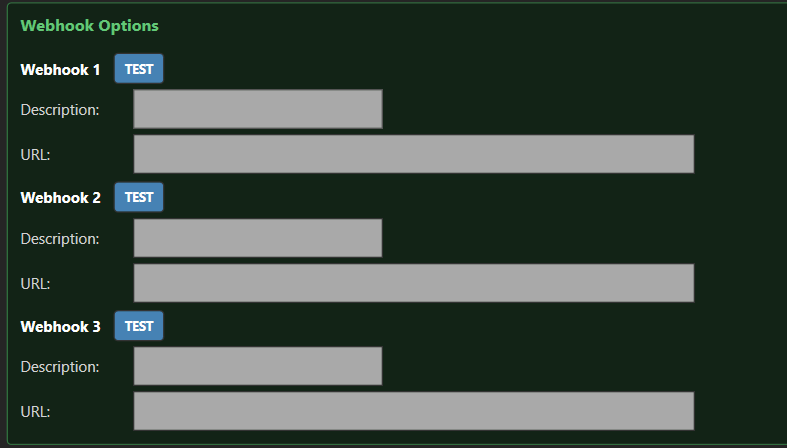
Each webhook has two fields:
- URL — the full Discord webhook URL obtained from the steps above.
- Description — a label for your own reference (e.g. Race Control, Stewards, Public Feed).
You can configure up to three separate webhooks, allowing different buttons to post to different Discord channels.
Assigning Webhooks to Buttons
ElevenLabs Configuration
Overview
ElevenLabs is a cloud-based text-to-speech service that produces significantly more natural-sounding speech than Windows built-in voices. iReporter integrates with ElevenLabs as an optional voice engine — when configured, all button voice output uses ElevenLabs instead of Windows TTS.
ElevenLabs requires an internet connection during races. A free-tier account provides enough monthly character credits for most iReporter use cases.
Getting an ElevenLabs Account and API Key
- Go to https://elevenlabs.io and click Sign Up.
- Create a free account using your email address or a Google/Apple login.
- Once logged in, click your profile avatar (top-right) and select Profile + API Key.
- Under the API Key section, click Copy to copy your key.
Keep this key private — it controls access to your account credits.
Configuring iReporter
- In the iReporter settings panel, tick Enable Voice in the top bar.
- In the Voice Options panel, set the Voice Engine dropdown to Eleven Labs.
- Paste your API key into the API Key field.
- Click Load Voices to fetch the list of voices available on your account.
- Select a voice from the Voice dropdown.
- Click Test Voice to hear a sample phrase spoken with the selected voice.
Voice Output Device
By default, voice output goes to your system's default audio device. You can route it to a specific device using the Voice Output Device dropdown:
- Default (system audio) — plays through your normal speakers or headset
- VB-Audio CABLE Input — routes audio into a virtual microphone, which can then be used as your iRacing in-car microphone so race control hears the spoken message
VB-Audio Virtual Cable is free software available at https://vb-audio.com/Cable/.
Choosing a Voice
ElevenLabs offers dozens of pre-made voices as well as the ability to clone custom voices. For race reporting, clear and authoritative voices work best. After clicking Load Voices, try a few with Test Voice until you find one that reads race messages clearly at speed.
You can browse voices on the ElevenLabs Voice Library to preview them before loading in iReporter.
Troubleshooting
| Issue | Fix |
|---|---|
| Load Voices returns empty list | Check your API key is correct and your account is active. Free accounts may have usage limits. |
| Test Voice fails with error | Ensure your API key is saved (click outside the field first). Check your internet connection. |
| Voice plays through wrong device | Use the Voice Output Device dropdown to select the correct output. |
| No voice heard during race | Confirm Enable Voice is ticked globally. Check the per-button Speak Text is not empty and Disable Voice for this button is not ticked. |
Switching Back to Microsoft Voice
To revert to Windows TTS, use the Voice Engine dropdown and select Microsoft Voice, or click the Switch to Microsoft Voice button inside the ElevenLabs panel. This clears the stored API key and voice selection.
Push to Talk Setup
Overview
When iReporter speaks a message aloud, you want your in-sim radio to transmit that voice to race control and other drivers. iReporter's Push to Talk feature automatically holds down a keyboard key for the full duration of each spoken message — activating your iRacing radio PTT so the voice is broadcast on the radio channel.
No additional software or drivers are required. iReporter sends keypresses using hardware-level scan codes, which are indistinguishable from physical key presses.
How it Works
- You assign an F-key (or modifier + F-key) as PTT in iRacing's radio settings.
- You set the same key in iReporter's Push to Talk dropdown.
- When iReporter speaks, it holds that key down before audio starts and releases it after audio ends.
- iRacing sees a hardware keypress and activates the radio channel for the full duration of the spoken message.
Configuring iRacing PTT
- Open iRacing and go to Options > Controls (or the equivalent in-sim settings).
- Find the Push to Talk or radio transmit binding.
- Bind it to an F-key — for example, F9. Choose a key that does not conflict with other iRacing bindings.
- Save and close options.
Configuring iReporter PTT
In the iReporter settings panel, with Enable Voice ticked, the Push to Talk box appears inside the Voice Options panel.
Select the same key from the PTT Key dropdown:
| Group | Options | When to use |
|---|---|---|
| Plain F-keys | F1 – F12 | iRacing PTT bound to a plain function key |
| Ctrl combinations | Ctrl+F1 – Ctrl+F12 | iRacing PTT bound to Ctrl + F-key |
| Shift combinations | Shift+F1 – Shift+F12 | iRacing PTT bound to Shift + F-key |
| None | (None) | No PTT — voice plays without pressing any key |
Example: if you bound iRacing's PTT to F9, select F9 from the dropdown.
Testing PTT
Voice Before Text
iReporter always speaks the voice message before sending text messages to the iRacing chat box. The chat key (T) is only pressed after PTT has been fully released. This prevents the chat window from interrupting the radio transmission.
Output Volume
If competitors report your voice is too quiet, increase the Output Volume in the Voice Options panel. The default is 100%. Values of 150%–175% are recommended if the signal sounds weak on the radio.
Troubleshooting
| Issue | Fix |
|---|---|
| PTT does not activate in iRacing | Confirm the key in the iReporter dropdown exactly matches the key bound in iRacing Controls. Re-bind in iRacing if needed. |
| Radio activates but voice is not heard by others | Check your audio output device in Voice Options. For iRacing radio, set Voice Output Device to VB-Audio CABLE Input (or your virtual audio cable) so the voice audio is routed as microphone input into iRacing. |
| PTT drops mid-message on a pause | iReporter plays silence audio during {PAUSE} tokens to keep the radio channel open. If you upgraded from an older version, update to v0.141 or later. |
| Voice plays but no PTT press is detected | Ensure the PTT Key dropdown is not set to (None). Check that SimHub has the necessary permissions to inject input (try running SimHub as Administrator). |