# DMR Dual Channel Radio
# Introduction
The dual receive radio comes in two variants, the 10-watt and 5-watt versions. By default, we are only supplying the 10-watt version to customers. The functionality between these two different options is identical.
This radio has a large number of functions, and we try to cut them back to the basic features that race car competitors are likely to use.
*What is the difference between a dual receiver and a scanning receiver?*
Our radio is a **"dual receive"** - what this means is that it will listen to 2 channels at once. When it hears a signal on one of the channels, the receiver will lock onto and listen to that channel.
A "Scanning Receiver", on the other hand, continuously changes from one channel to another, and when it hears something, it locks onto that channel.
While this sounds similar in functionality, the offering is vastly different in reality. The issue we have seen with scanning receivers is the time it takes to lock onto a conversation and, once the conversation is complete, to resume scanning. With the dual receive option, there is practically no delay, making it a better option in our situation.
# Getting Started with Your Speedtech Radios
### Pre-Installation Testing
We've designed these radios to be straightforward to use. Before installing them in your vehicle, we recommend a simple walk-through test with two people:
1. Take both radios out of the car
2. Have one person walk away with a radio while the other stays in place
3. Test the range and confirm both units are working as expected
This gives you a feel for how the radios perform in your environment before race day.
### How Your Radios Work
These are two-way radios, not cell phones. They operate in **half-duplex mode**, which means only one person can transmit at a time—the other person listens. This is different from a phone call, where both parties can speak simultaneously.
**Make sure both radios are set to the same channel** for them to communicate.
We strongly recommend testing your radios well before race day. Radio performance is affected by many factors—terrain, weather, vehicle placement—so getting comfortable with them beforehand will save you problems when it counts.
### Legal Configuration Requirements
Most setups use one "dual receive" radio and one "single receive" radio. Here's why: only one end needs to monitor the track radio.
**Important:** According to racing regulations, the driver must hear the track radio directly. Relaying the track signal through a team member is not legal and could result in disqualification.
### Vehicle Installation
Once your walk-through testing confirms everything works:
1. Install the radios in your vehicle
2. Test them again in the car before race day
3. Confirm performance with your actual setup
If your team understands how the radios work and has tested them thoroughly, you'll experience far fewer problems on race day.
# Radio Components
It is important to understand the different components and buttons around the radio. These enable you to set the radio's options.
**Front View**
[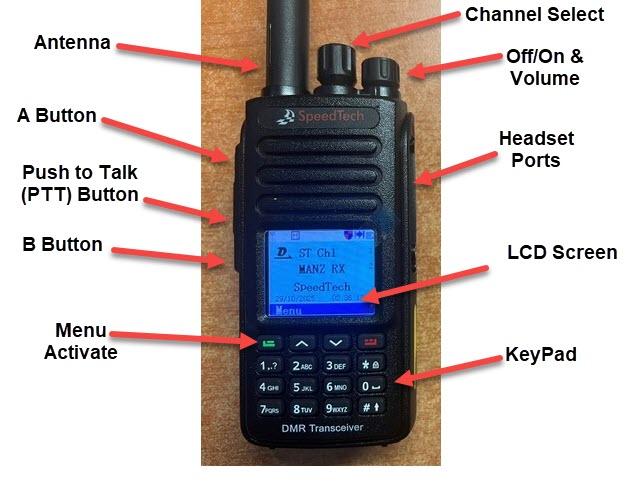](https://books.speedtech.co.nz/uploads/images/gallery/2026-05/dual-fonton.jpg)
**Left Side View**
[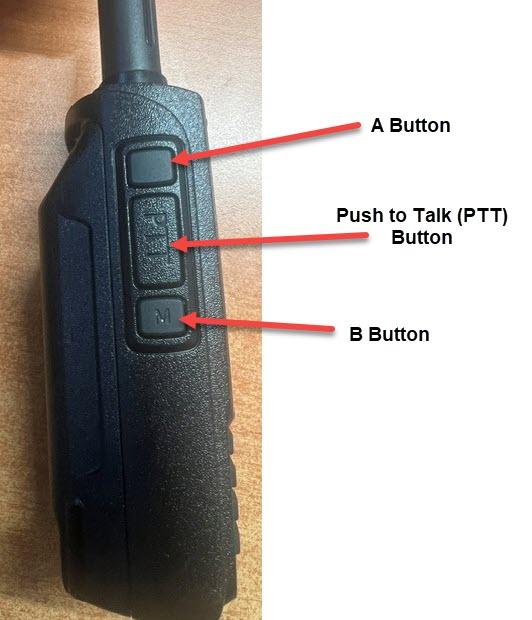](https://books.speedtech.co.nz/uploads/images/gallery/2026-05/dual-left.jpg)
**Right Side View**
[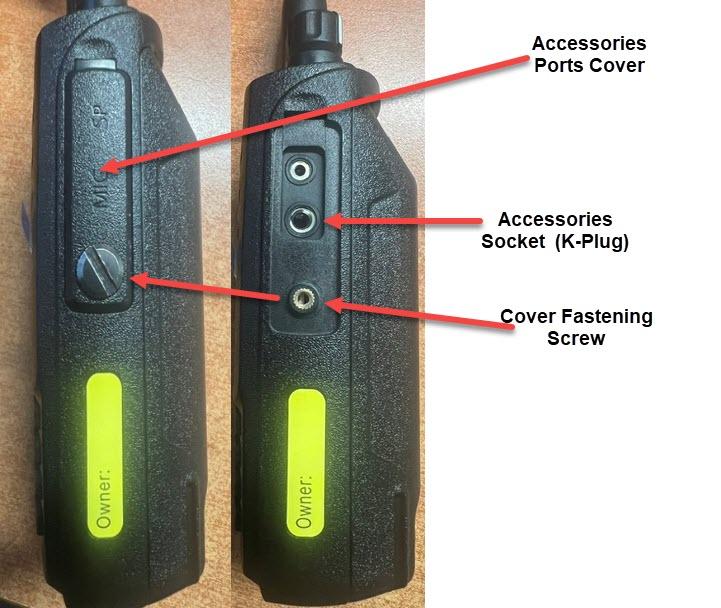](https://books.speedtech.co.nz/uploads/images/gallery/2026-05/dual-right.jpg)
**Back View**
[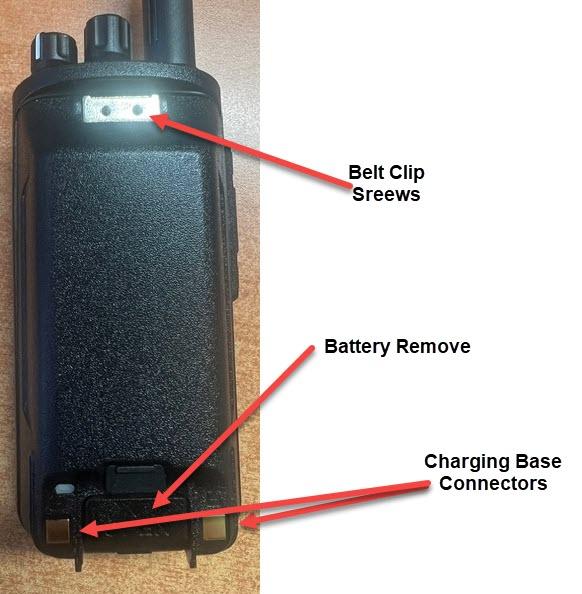](https://books.speedtech.co.nz/uploads/images/gallery/2026-05/dual-backon.jpg)
# Installing Your Handheld DMR Race Radio
### What You Need
- Your DMR handheld radio
- A suitable mounting location in the car
- Optional: adhesive mounting pad or small bracket
- Optional: cable ties or velcro straps for cable management
### Installation Steps
#### 1. Choose Your Mounting Location
Select a spot where the driver can easily reach and operate the radio without taking their hands off the wheel for extended periods. Common locations include:
- Dashboard (secured with adhesive pad)
- Roll cage (cable-tied to a suitable bar)
- Door panel or A-pillar
- Center console
Avoid locations where the radio could become a hazard in a crash or obstruct controls you need during the race.
#### 2. Mount the Radio
**Using an adhesive pad:**
- Clean the mounting surface with a dry cloth
- Apply the adhesive pad to the back of the radio or mounting bracket
- Press firmly in place and let it set (follow pad instructions for cure time)
**Using cable ties or velcro:**
- Secure the radio to your chosen location with cable ties or industrial-strength velcro straps
- Ensure it's snug and won't rattle or move during driving
#### 3. Position the Antenna
- Keep the antenna vertical or slightly angled for the best reception
- Avoid positioning it where it could break or interfere with the driver's movement
- If using a handheld, the antenna should point upward from the radio
#### 4. Test Before Race Day
- Turn on the radio and confirm it powers up
- Check that your team can communicate on the correct channel
- Test range and clarity from the driver's position in the car
- Confirm the driver can operate it safely without distraction
### Important Notes
- Keep the radio accessible but secure—it shouldn't move around during hard cornering or braking
- Test communication with your pit crew or chase vehicle before heading to the track
- Make sure the driver knows how to transmit and receive before race day
- Check that the antenna won't be damaged by roll cage bars or other components
# LCD Display
Firstly, to determine the default settings for the radio. This is MOST likely how you will have the radio set in day-to-day use
[](https://books.speedtech.co.nz/uploads/images/gallery/2026-05/lcd1.jpg)
Pressing the "B Button" on the left-hand side of the radio will change the LCD to look as below.
[](https://books.speedtech.co.nz/uploads/images/gallery/2026-05/lcd2.jpg)
**IMPORTANT: Leaving the radio will disable Transmit because** the Active channel is set to a "Receive Only" Channel. You need to press the B-Button again to have the active channel move back to the top ST (Speedtech) channel.
# Enable Keypad
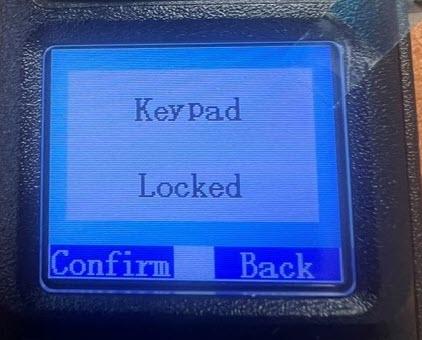
If you get a message saying the "Keypad is locked", you have 2 options to unlock it.
[](https://books.speedtech.co.nz/uploads/images/gallery/2026-05/keypad-locaked.jpg)
1. Turn the radio off, then on again - the keypad will be unlocked for 15 seconds on radio startup,
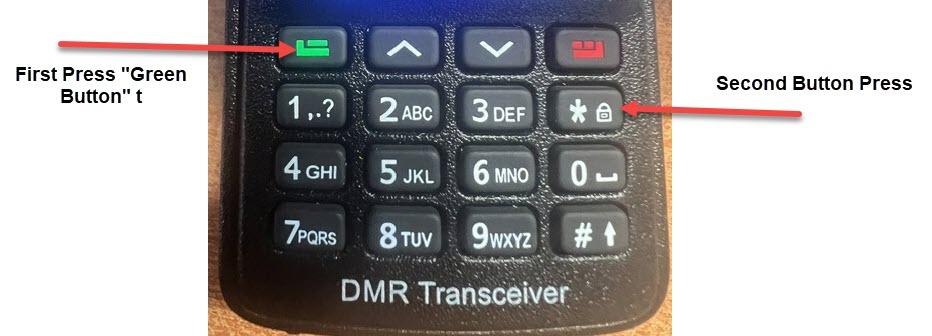
2. Use the Keypad to unlock the Keypad. This is done by pressing the Green button, then the \* button. Once done, you should see a message on the screen saying "Keypad Unlocked"
[](https://books.speedtech.co.nz/uploads/images/gallery/2026-05/unlock-buttonpress.jpg)
# Standby Channel Recieve Dissable
The radio can disable one of the channels. To disable a channel, ensure the channel that you want to disable is not the active channel. **You can change the active channel by pressing the B Button to toggle between them.**
[](https://books.speedtech.co.nz/uploads/images/gallery/2026-05/dual-left.jpg)
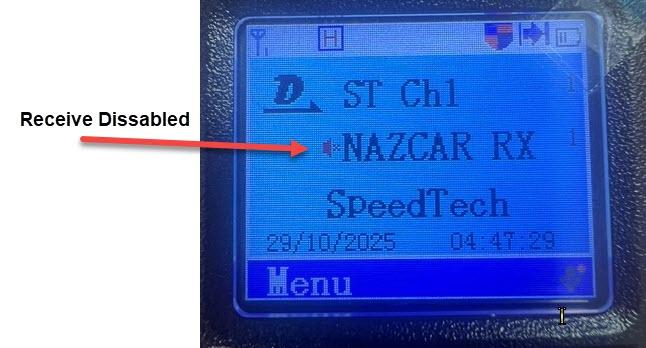
Once you have the channel that you DON'T want to disable as the active channel, press the RED button on the front keypad. [](https://books.speedtech.co.nz/uploads/images/gallery/2026-05/qB7lcd2.jpg)
Press the RED to disable the Receive on the standby channel.
[](https://books.speedtech.co.nz/uploads/images/gallery/2026-05/rx-dissabled.jpg)
If you get a message saying the "Keypad is locked", you have 2 options to unlock it.
[](https://books.speedtech.co.nz/uploads/images/gallery/2026-05/keypad-locaked.jpg)
1. Turn the radio off, then on again - the keypad will be unlocked for 15 seconds on radio startup,
2. Use the Keypad to unlock the Keypad. This is done by pressing the Green button, then the \* button. Once done, you should see a message on the screen saying "Keypad Unlocked"
[](https://books.speedtech.co.nz/uploads/images/gallery/2026-05/unlock-buttonpress.jpg)
Once unlocked, you can now press the RED button to disable the standby channel.
To enable - Press the red button again. The disabled marker should disappear.
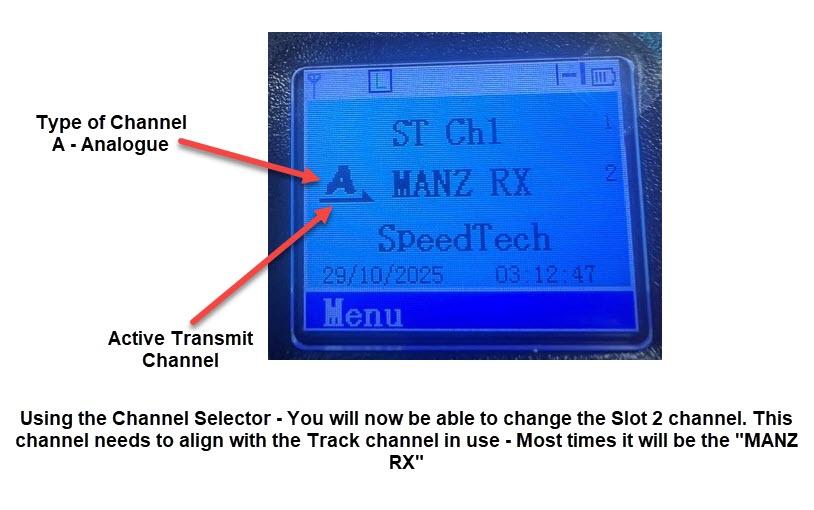
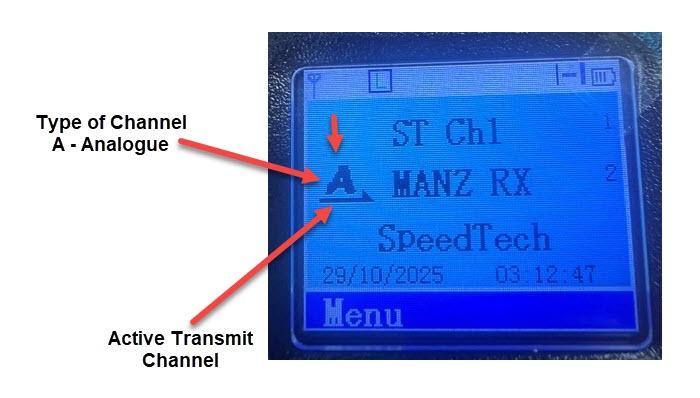
# How to Change Receive Channel
The radio receives a second channel, and in New Zealand we have 2 channels that could be used at tracks. 99% of the time, this will be set to the "MANZ RX", which is Motorsport Association of NZ receive, and what will be used on most tracks and track days.
The other option is the NAZCAR series. They use their own separate channel. It is important to have this set correctly so you can hear the track messages.
To change the Receive channel, first press the "B Button" on the side of the radio to move the active channel to the bottom channel. You should also notice the letter on the channel type change from "D" (Digital) to "A" (Analogue) - all track channels are Analogue.
[](https://books.speedtech.co.nz/uploads/images/gallery/2026-05/dual-left.jpg)
[](https://books.speedtech.co.nz/uploads/images/gallery/2026-05/change-active-channel.jpg)
Now use the Channel selector to change the channel - It will cycle through the available receive channels (currently on 2)
[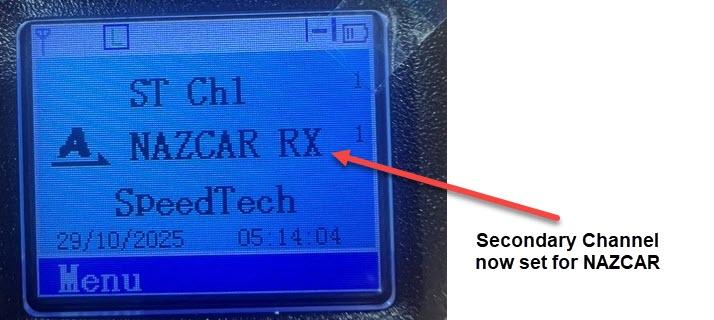](https://books.speedtech.co.nz/uploads/images/gallery/2026-05/nazcarrx.jpg)
IMPORTANT: Once complete, it is imperative that the ACTIVE channel is set back to the top channel by pressing the "B Button" again. If you do not do this, it will disable the transmit function, as transmit is disabled on the receive-only channels in the bottom slot.
[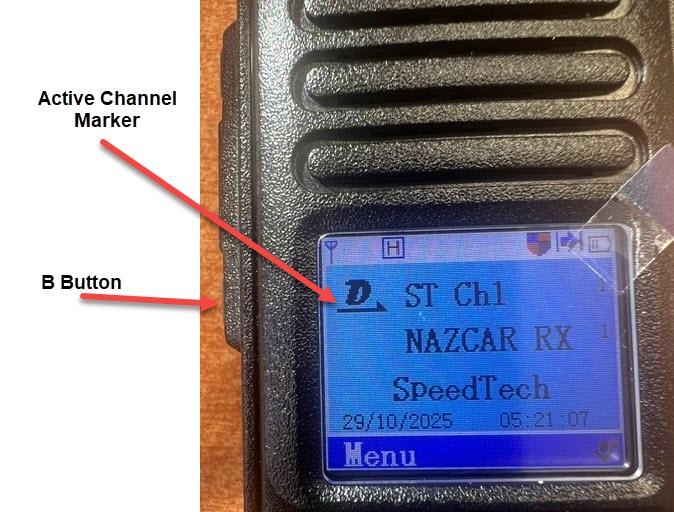](https://books.speedtech.co.nz/uploads/images/gallery/2026-05/activechannel.jpg)
# Setting the Squelch (Only applies to ANALOGUE Channels)
Analogue channels are susceptible to noise. Noise can be described in many ways and is often recognised by hearing static or other unwanted sounds on the radio.
The squelch setting acts like a gate, blocking unwanted noise below a certain level. By changing the Squelch settings, we can adjust where that noise setting is.
Please Note: Be careful here and ONLY make the changes as directed - failure to do so could make the radio fail to operate as expected.
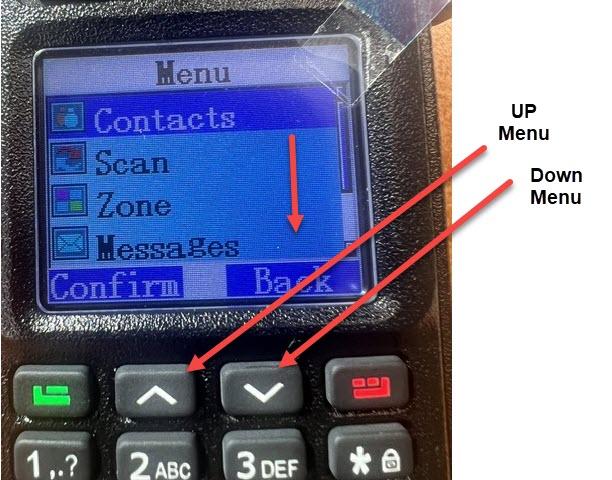
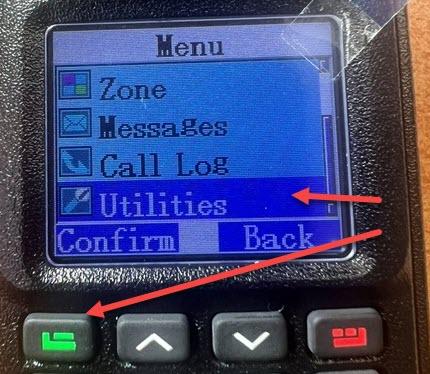
1. Press the "Green" button on the keypad. If you get the "Keypad is locked" message, [see the page on how to unlock the keypad.](https://books.speedtech.co.nz/books/dmr-dual-channel-radio/page/enable-keypad)
2. Use the Down Arrow to select "Utilities" from the menu, followed by the Green Button (Confirm)
[](https://books.speedtech.co.nz/uploads/images/gallery/2026-05/sq1.jpg)
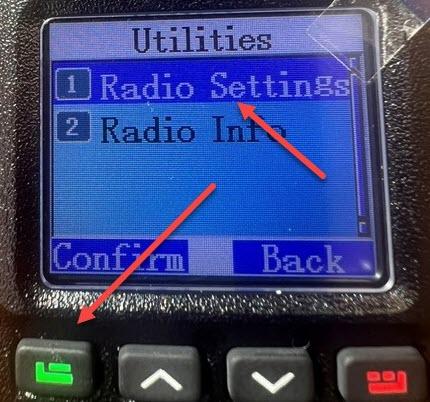
3. Select "Radio Settings" and once again, the Green Button (Confirm)
[](https://books.speedtech.co.nz/uploads/images/gallery/2026-05/sq2.jpg)
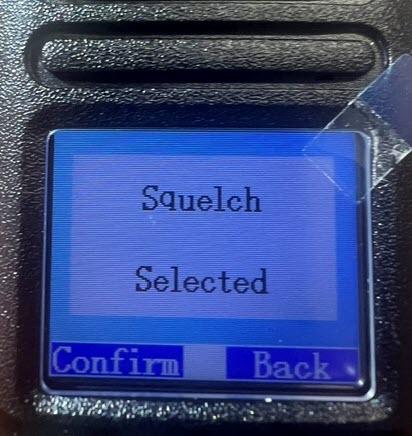
4. Select "Squelch" and once again, the Green Button (Confirm)
[](https://books.speedtech.co.nz/uploads/images/gallery/2026-05/sq3.jpg)
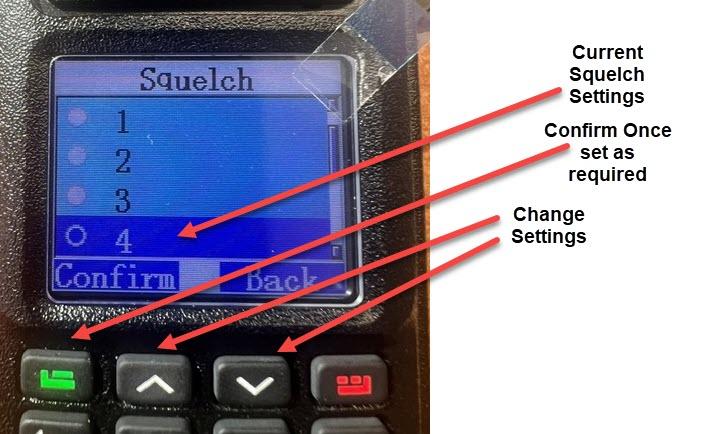
5. You will now be selected by the Squelch settings - It will show you the current level set. The higher the value, the higher the gate or filter bar is set.
[](https://books.speedtech.co.nz/uploads/images/gallery/2026-05/sq5.jpg)
6. Select whatever is needed, and once again, the Green Button (Confirm)
[](https://books.speedtech.co.nz/uploads/images/gallery/2026-05/sq6.jpg)
NOTE: If you wind up the Squelch setting up and are still receiving "noise", - it can mean you are in a super high interference environment, and we will need to look into other solutions. Contact SpeedTech to discuss options
# Radio Communication Troubleshooting Guide
### Before You Start
Make sure both radios are powered on and set to the **same channel**. This is the most common cause of no communication. If you still can't hear anything, work through the checks below.
### Check the Basics First
**Battery Level**
- Confirm both radios have an adequate battery. A low battery can reduce transmission power and range
- Replace or recharge batteries if needed
**Channel Setting**
- Verify both radios are on the same frequency/channel—mismatched channels are the leading cause of communication failure
- Check the display or LED indicators to confirm the channel number matches on both units
**Volume Level**
- Check the volume isn't muted or turned too low
- Adjust the volume knob on the receiving radio
**Transmission Indicator**
- When transmitting, look for a transmit indicator light or LED on the sending radio—it should light up when you press the push-to-talk button
- If there's no indicator light when pressing the button, the radio may not be transmitting
### Range and Environment Issues
Radio performance depends heavily on your environment. If both radios are on the same channel but communication is weak or cuts out:
**Test in Open Space**
- Move to an open area away from buildings, metal structures, or dense obstacles
- If communication improves, your original location has interference or obstruction
- Metals, concrete, and hills all block radio signals
**Check Antenna Positioning**
- Ensure the antenna is fully extended and vertical (not bent or folded)
- A damaged or missing antenna cap will severely reduce range
- Try rotating the antenna slightly to find better reception
**Reduce Distance**
- Move the radios closer together to test basic communication
- If they work at short range but fail at distance, you're hitting the limits of your radio's power and environment
- This is normal and tells you where your effective range is
**Test at Race Venue**
- Radio performance varies by location. Test at the actual track before race day
- Track layout, grandstands, and metal structures affect signals differently than your home location
### Check for Transmission Problems
**Radio Transmitting but Not Receiving**
- One radio talks, but the other doesn't hear it
- Check that the receiving radio's volume is actually turned up (not just the dial position—the speaker may be muted)
- Try both radios transmitting and receiving to isolate which one isn't working properly
**Crackling or Distorted Audio**
- This usually indicates interference from nearby electronics, power lines, or other radio sources
- Try a different channel if available
- Move away from potential interference sources (power cables, generators, other radios)
- Check that antenna connections are tight and secure
**Intermittent Communication**
- Communication works sometimes, but cuts out randomly
- This often points to loose cable connections or a failing battery
- Check all antenna connections are tight
- Test with fresh batteries
### Physical Inspection
**Antenna Connection**
- Ensure the antenna is screwed firmly onto the radio connector
- Check for bent antenna pins or damaged threads
- A loose antenna is a common cause of weak or no transmission
**Cable Connections**
- If using an external antenna or speaker, confirm all cables are seated properly
- Look for bent pins or corrosion in connectors
**Damage**
- Inspect both radios for cracks, water damage, or physical damage to the case
- Check that the push-to-talk button works when pressed
- Listen for any rattling inside the radio case (internal damage)
**Speaker and Microphone**
- Confirm the speaker grille isn't blocked or covered
- Check that the microphone opening is clear and not obstructed
### Frequency and Repeater Issues
**Using a Repeater**
- If your radios require a repeater to communicate (depending on your frequency allocation), confirm the repeater is on and operational
- You may need to check with your local radio authority or repeater operator
- Without an active repeater, direct radio-to-radio communication may not work on certain frequencies
**Frequency Licensing**
- Confirm you're using a frequency you're licensed to operate on
- Unlicensed frequencies or incorrect frequency programming will prevent communication
### Test Procedure
1. **Power both radios on** and confirm they boot up normally
2. **Set both to the same channel** and verify the display shows matching frequencies
3. **Stand 10 meters apart** in an open space
4. **Press push-to-talk on Radio A** and hold it while speaking clearly
5. **Listen on Radio B**—you should hear the transmission clearly
6. **Repeat in reverse** with Radio B transmitting and Radio A listening
7. **Gradually increase the distance** and note where communication becomes unclear or drops out
8. **Test at your race venue** to confirm performance in the actual environment
### Still Not Working?
If you've worked through all these checks and still have no communication:
- Contact Speedtech support with details of what you've tested
- Bring both radios to us for a functional test
- There may be a hardware fault that requires professional diagnosis
**Document what you've found:** Note which radios work together, which don't, what channels you've tested, and at what distances communication fails. This information helps us diagnose the problem quickly.